
TEMPLATES
Traditional templates
Creating a new template
To create a new application, follow the steps below. Before you begin, make sure you have an account, and you are logged in.
1. Navigate to the “Templates” tab from the main menu.
2. The list of existing templates will be displayed.
3. Click the “Create New Template” button.
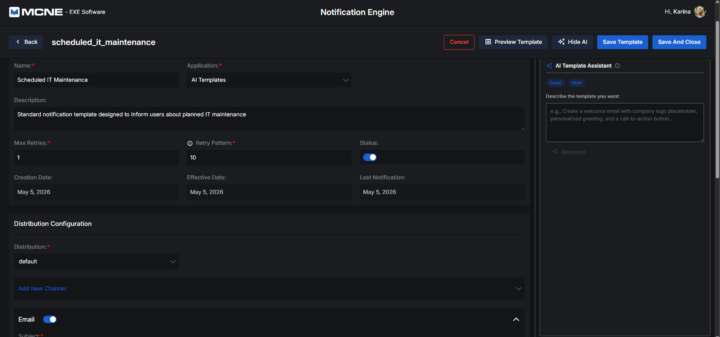
4. A new page will open where you can fill in the template details.

Mandatory Fields:
- ID – a unique identifier for the template. Once a template is saved with and ID, this ID cannot be changed.
- Name – the template’s name
- Application – Select an application from the dropdown list of existing applications.
- Max Retries – Number of retry attempts: Pre-filled with 1, but editable.
- Retry Pattern – Retry interval value. Pre-filled with 10, but editable.
- Distribution – Delivery method configuration. Pre-filled with default.
Optional Fields:
- Description – Add context or notes (optional).
- Status – Defaults to Inactive. You can change it later.
- Creation Date, Effective Date, Last Notification – Informational, editable if needed.
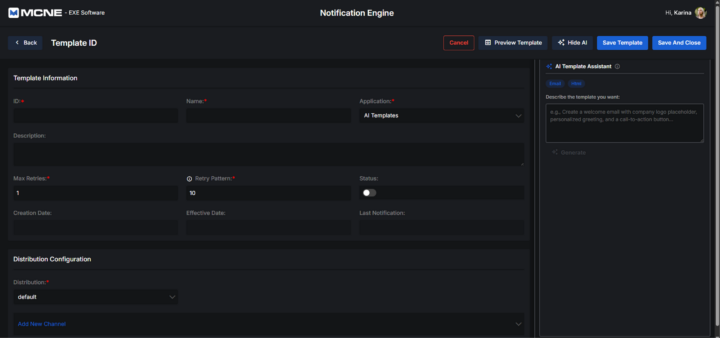
5. Scroll down to “Distribution Configuration” and click on the “Add New Channel”. You can choose a channel (e.g., Email, Slack, Teams, SMS).
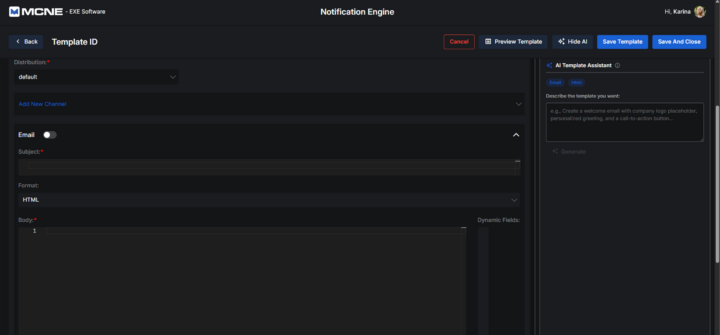
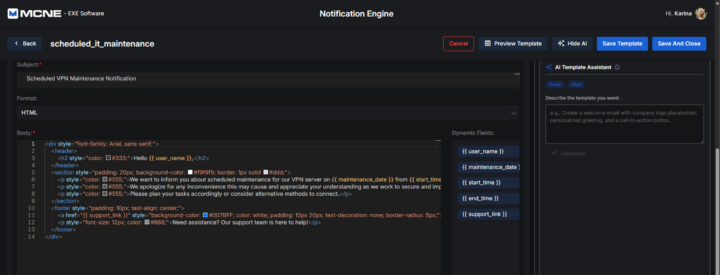
6. After selecting a channel, configure its content format:
- Choose between HTML or Text format.
- Fill in the Body of the notification message.
- For channels like Email, also enter the Subject.
- You can use dynamic variables in double curly brackets, e.g., {{user.name}}.
Tip: If you’re using Jinja format, you can consult this documentation for syntax guidelines and examples.
Example Email Channel Configuration:
Subject:
7. Once all fields and channels are configured:
- Click “Preview Template” to review the output.
- Click “Save Template” to save your work and stay on the page.
- Click “Save and Close” to save and return to the template list.
Viewing a Template
To view the details of an existing template, follow the steps below. Make sure you’re logged into your account.
1. Navigate to the “Templates” tab from the main menu.
2. The list of existing templates will be displayed.
3. Find the template you want to view and click the “Details” button next to it.

4. The full Template Details page will appear, organized into two main sections:
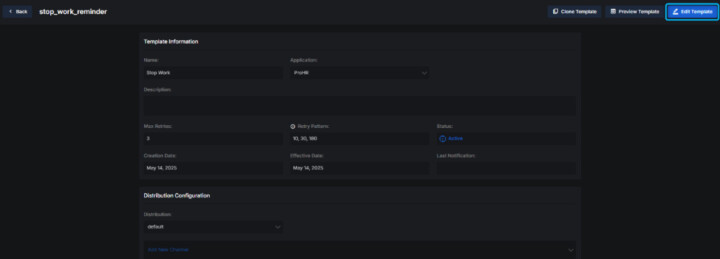
Template Information
This section provides key details about the template:
- Name – The template’s name.
- Application – The application the template is linked to.
- Description (Optional) – Additional information about the template.
- Max Retries – Number of retry attempts allowed.
- Retry Pattern – Time interval (in seconds) between retries.
- Status – Indicates whether the template is Active or Inactive.
- Creation Date – The date the template was created.
- Effective Date – When the template becomes effective (if applicable).
- Last Notification – Timestamp of the last notification sent using this template.
Distribution Configuration
This section outlines how the template sends messages:
- Distribution – The delivery method or configuration assigned to the template.
- Channels – Each added channel (e.g., Email, Slack, Teams, SMS) includes:
- Subject – For applicable channels like Email.
- Format – Either Text or HTML/Jinja.
- Body – The notification content, which can include dynamic variables like {{user.name}}.
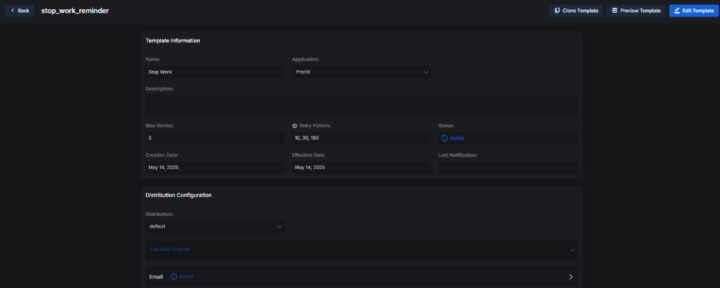
5. At the top of the Template Details page, you will find the following buttons:
- Edit Template – Opens the template in edit mode so you can make changes.
- Preview Template – Shows a preview of how the message will appear when sent.
- Clone Template – Creates a copy of the current template, allowing you to reuse and adjust it as needed.
Cloning a Template
To clone an existing template, follow the steps below. Before you begin, make sure you have an account, and you are logged in.
1. Navigate to the “Templates” tab from the main menu.
2. Find the template you want to duplicate and click the “Details” button.

3. On the Template Details page, click the “Clone Template” button.
A new cloned template is automatically created with the same details as the original template, including:
- Template Information (name, application, retries, etc.)
- Distribution settings
- All channel configurations (subject, format, body)
The cloned template opens immediately in edit mode, allowing you to make any adjustments before saving.
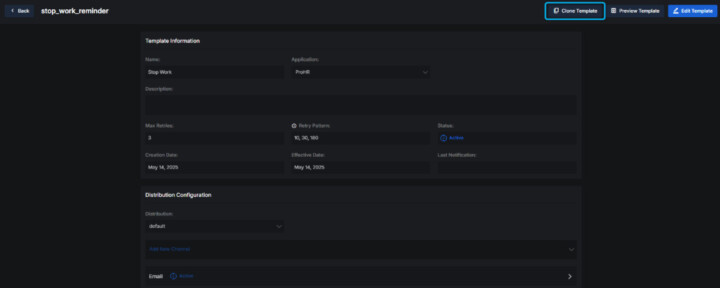
4. While editing the cloned template, the following buttons are available:
- Preview Template – View how the cloned notification will appear.
- Save – Save the cloned template and stay on the page.
- Save and Close – Save the cloned template and return to the template list.
Editing a Template
To edit an existing template, follow the steps below. Before you begin, make sure you have an account, and you are logged in.
1. Go to the “Templates” tab from the main menu.
2. Use the Application dropdown to filter templates by the desired application.
3. In the list of templates, click the “Details” button next to the template you want to edit.

4. The template details will be displayed on screen.
5. Click the “Edit Template” button.
Modify one or more fields as needed (e.g., update the Description or other values).
Editable Fields
You can modify the following fields as needed:
- Name (required) – Update the name of the template.
- Application (required) – Select or change the associated application.
- Description – Add or edit the description.
- Max Retries (required) – Change the number of retry attempts.
- Retry Pattern (required) – Update the retry interval.
- Creation Date and Effective Date – Modify if necessary.
Scroll down to Distribution Configuration section. You can manage distribution settings during editing:
- Distribution (required) – Update the method if needed (pre-filled with “default”).
- Add New Channel – Add a new delivery channel like Email, Slack, Teams, or SMS.
- Edit Existing Channel
- Update the Format (HTML/ JINJA or Text)
- Edit the Subject (for applicable channels like Email)
- Update the Body content.
- You can use dynamic variables wrapped in {{}}, for example {{user.name}}.
Tip: If you’re using Jinja format, you can consult this documentation for syntax guidelines and examples.
Example Email Channel Configuration:
Subject: